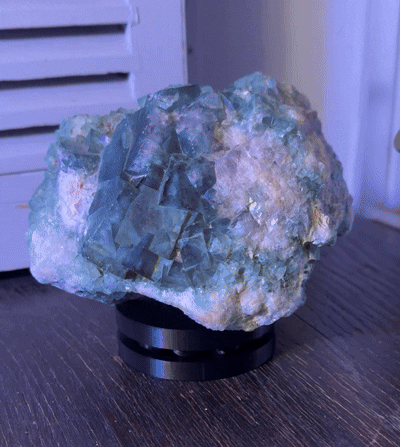
This week, the first part of the assignment that I did was to scan something using photogrammetry! I initially had no idea how to do this until Wyatt sent a message to the class WhatsApp with a glowing recommendation for the app PolyCam in the form of a cool 3D model of Eli! Since I saw what it could do, I immediately tried it out myself. My first attempt was to model a globe because I thought that it could turn and that would make it easy, plus this globe had topography modeled on it, which I thought would make for a neat 3D scan. However, multiple failed attempts later, and I was running out of my free scans on this app. I didn't want to keep wasting my limited free resources on this globe that wasn't working, so I tabled it and decided to try something else. In retrospect, the app works a lot better when the camera is moving and not the object, so that is good to know for future usages. I don't think that it was an issue with the globe itself, but rather my usage of the app was poor. I then was thinking about what Wyatt said in class about how photogrammetry works best with organic forms and stuff that isn't super reflective. Being an EPS concentrator and an insufferable nerd, I immediately jumped to a specimen from my rock collection! I thought that this could make for a cool 3D scan, and if I chose a cool sample that I had, I thought that it would be interesting to see the crystal structure modeled in 3D space. To get the best possible first scan and minimize the usage of my limited free scans, I set up one of my favorite rocks - a 2.2 kg chunk of gorgeous green fluorite with huge, well defined crystals - onto a rug that had a pattern which I thought would be conducive to scanning, and I shined as much light as possible onto it. Honestly my first scanning the fluorite was almost perfect, and a little more attention to detail and slowing the process down to ensure that I got every side of the rock scanned in the second attempt produced an awesome scan! Play around with it below:
This also has the added benefit of now I can look at this ~5 pound rock whenever I want on my phone! I love looking at my rocks, but many are fragile, so I don't want to handle them too heavily, and many are heavy, so I can't take them with me and look at them whenever. This 3D scanning thing solves both of those issues! I can digitize my whole collection and be able to look at it whenever and wherever I want to! Although that might require the pro subscription...
Assignment: Model and 3D print something
With this assignment, I was eager to try to solve a problem in my life, make something easier, do something productive, or really just to make a functional print. I didn't want to just make some random sculpture that would sit on my desk and get thrown out at the end of the year when I need to pack all of my stuff up. With that in mind, I began trying to think of things that I would actually use. I thought about making some sort of desk organizer or phone charger holder, but I kinda feel like there are already a lot of those that are easily accessible. Plus, it would be a lot more of using the same tools in Fusion that I've already used, and I wanted to spice it up a bit. Then, continuing on the theme of rocks, I was thinking about maybe making a multi-pronged stand that could hold up irregularly shaped rocks, which I think could still be an interesting project, but I also realize that the vast majority of my rocks are already free standing perfectly. However, I frequently find myself handling my rocks to look at all sides of them, and I rotate all of them somewhat frequently so that all sides can be on display. This is kinda stressful because many of my rocks are fragile, so I want to minimize handling of them, but I still want both myself and people that come over to my room to be able to see the full glory of my rocks. My solution, put my rocks on rotating lazy Susans so they can just spin, and I can see all sides of it without having to pick it up! Now, all I have to do is make a lazy Susan...
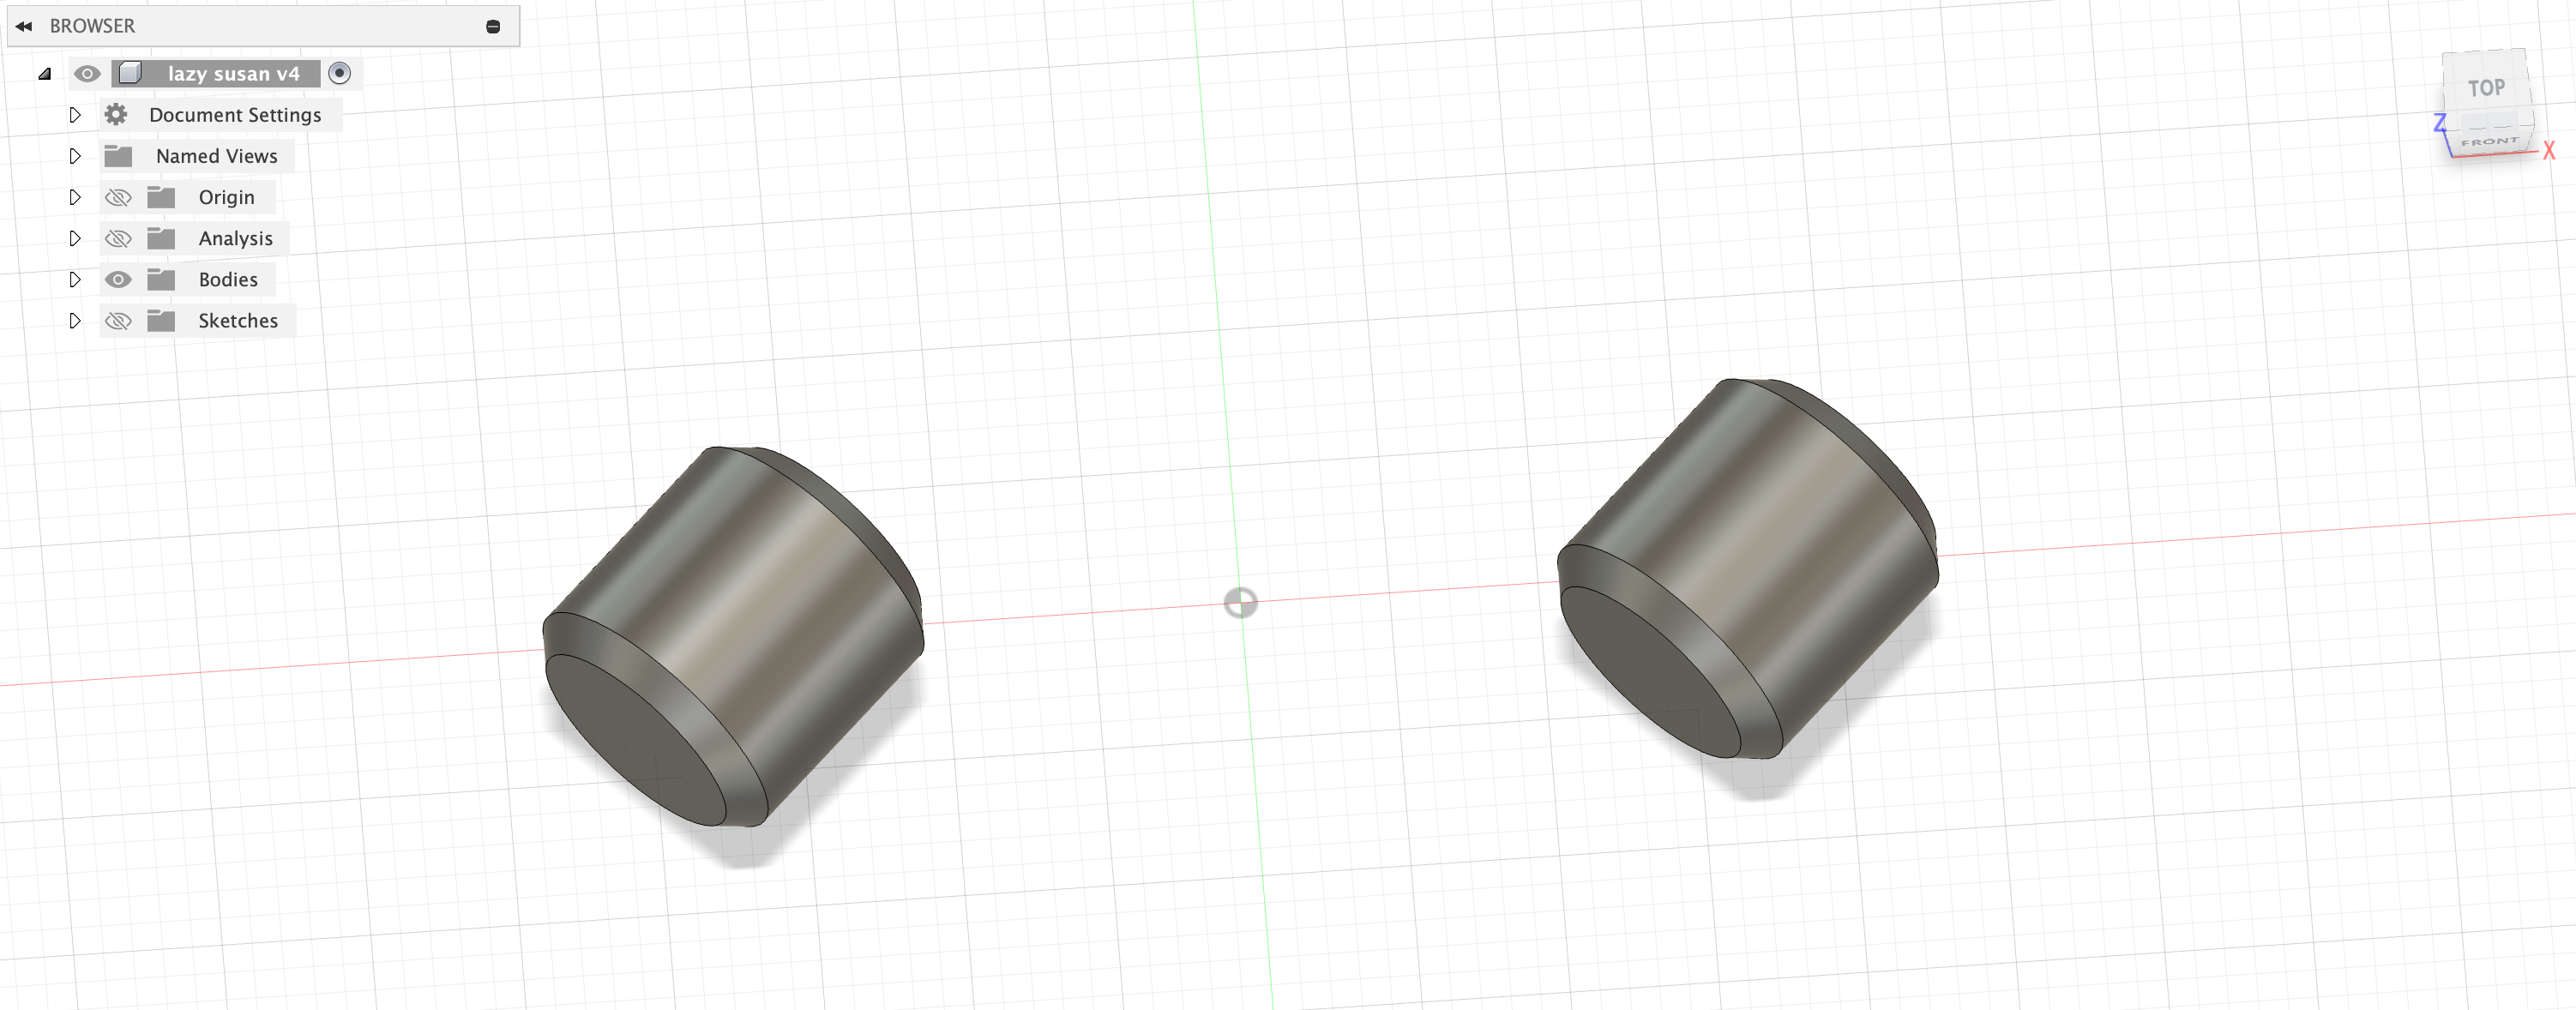
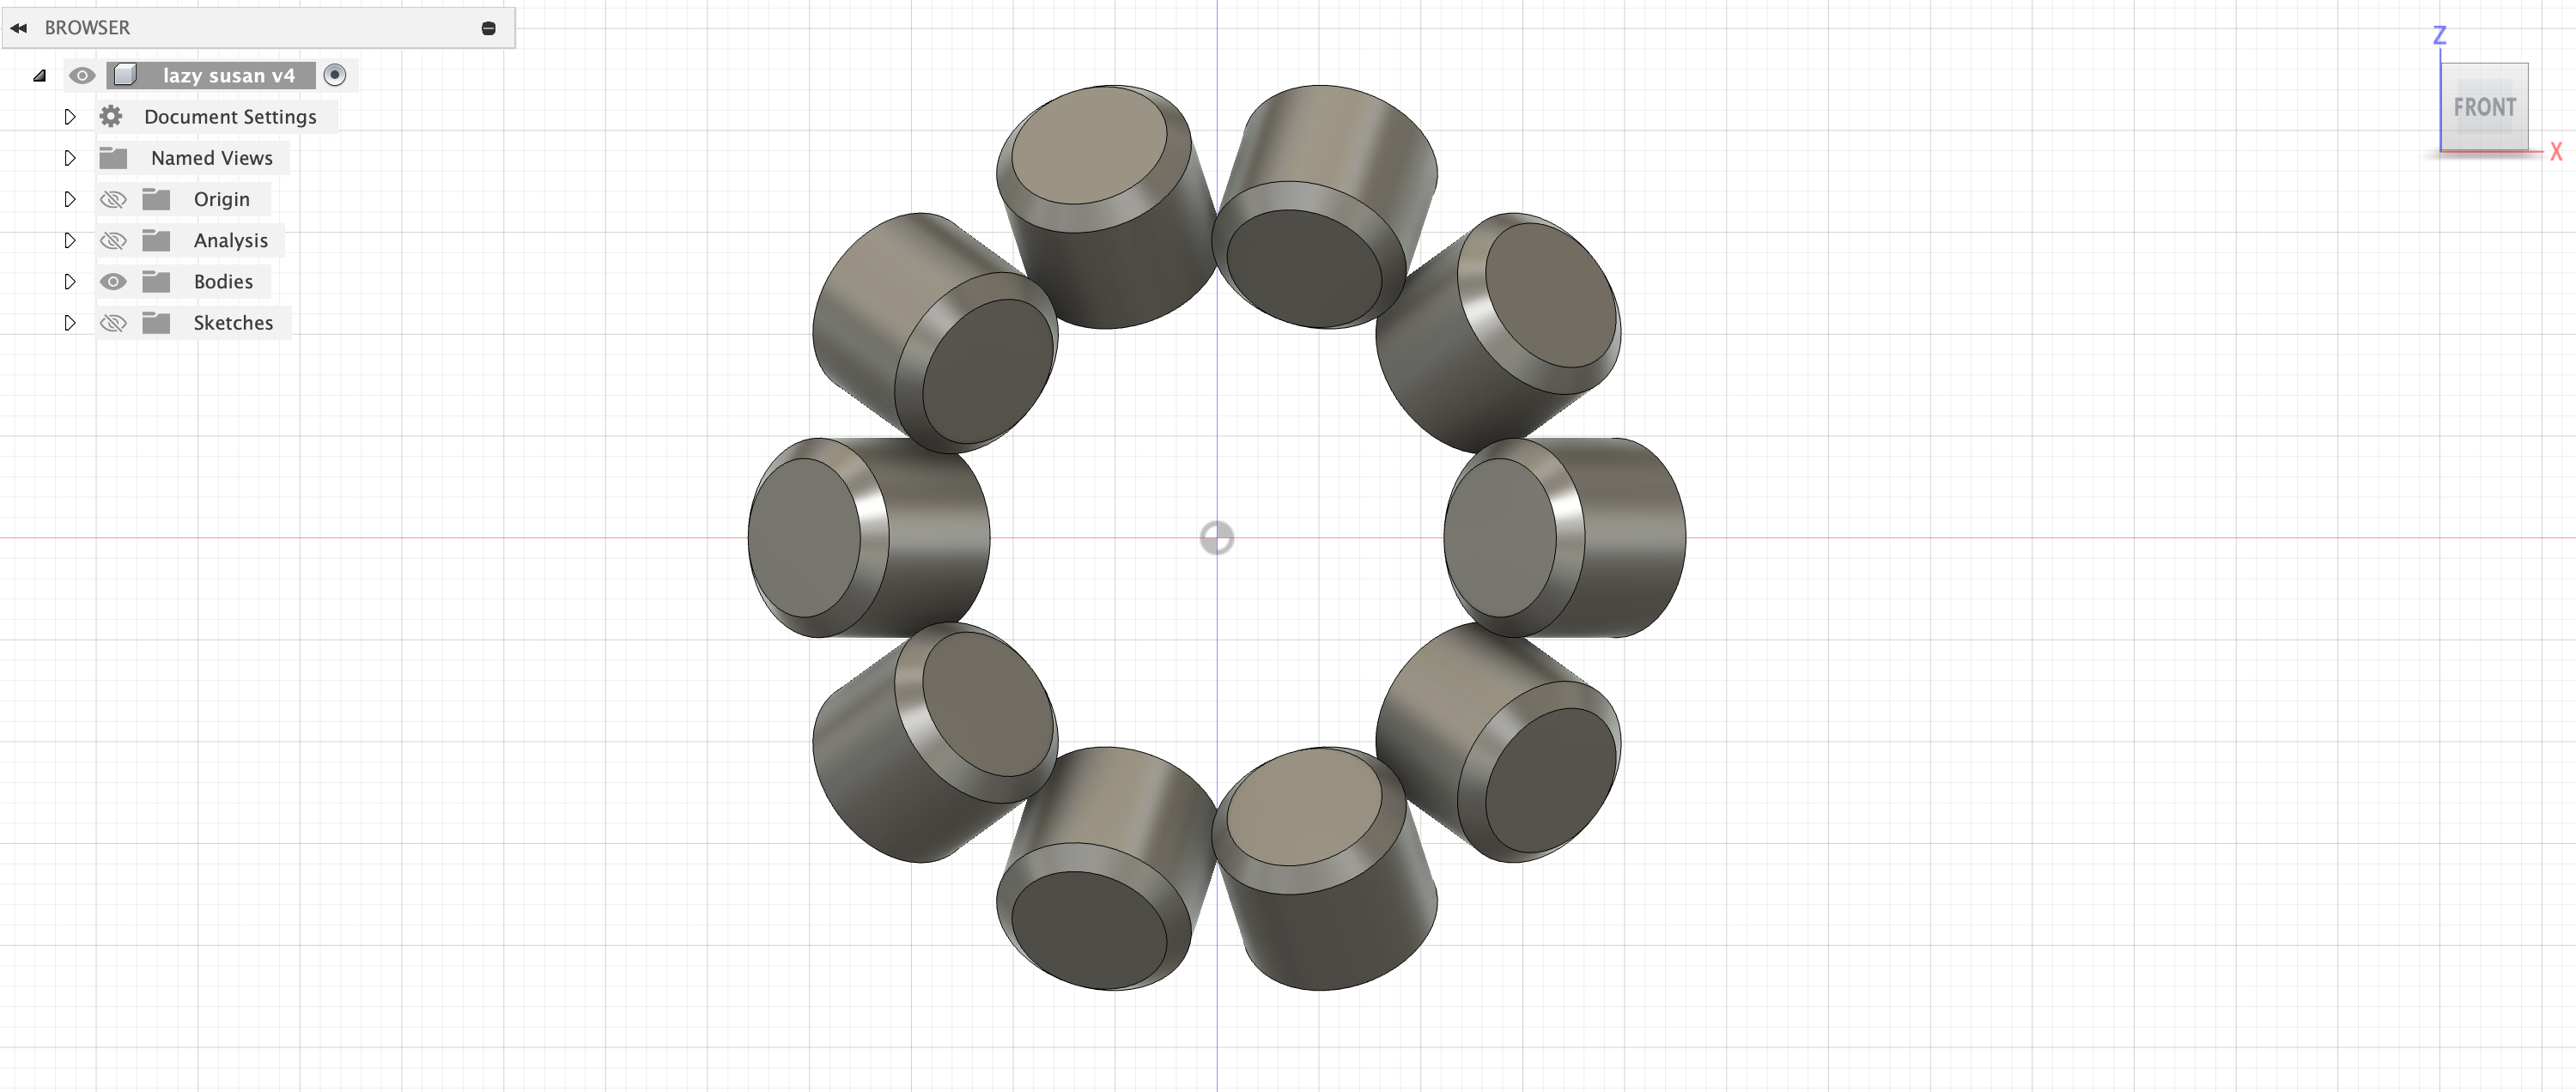
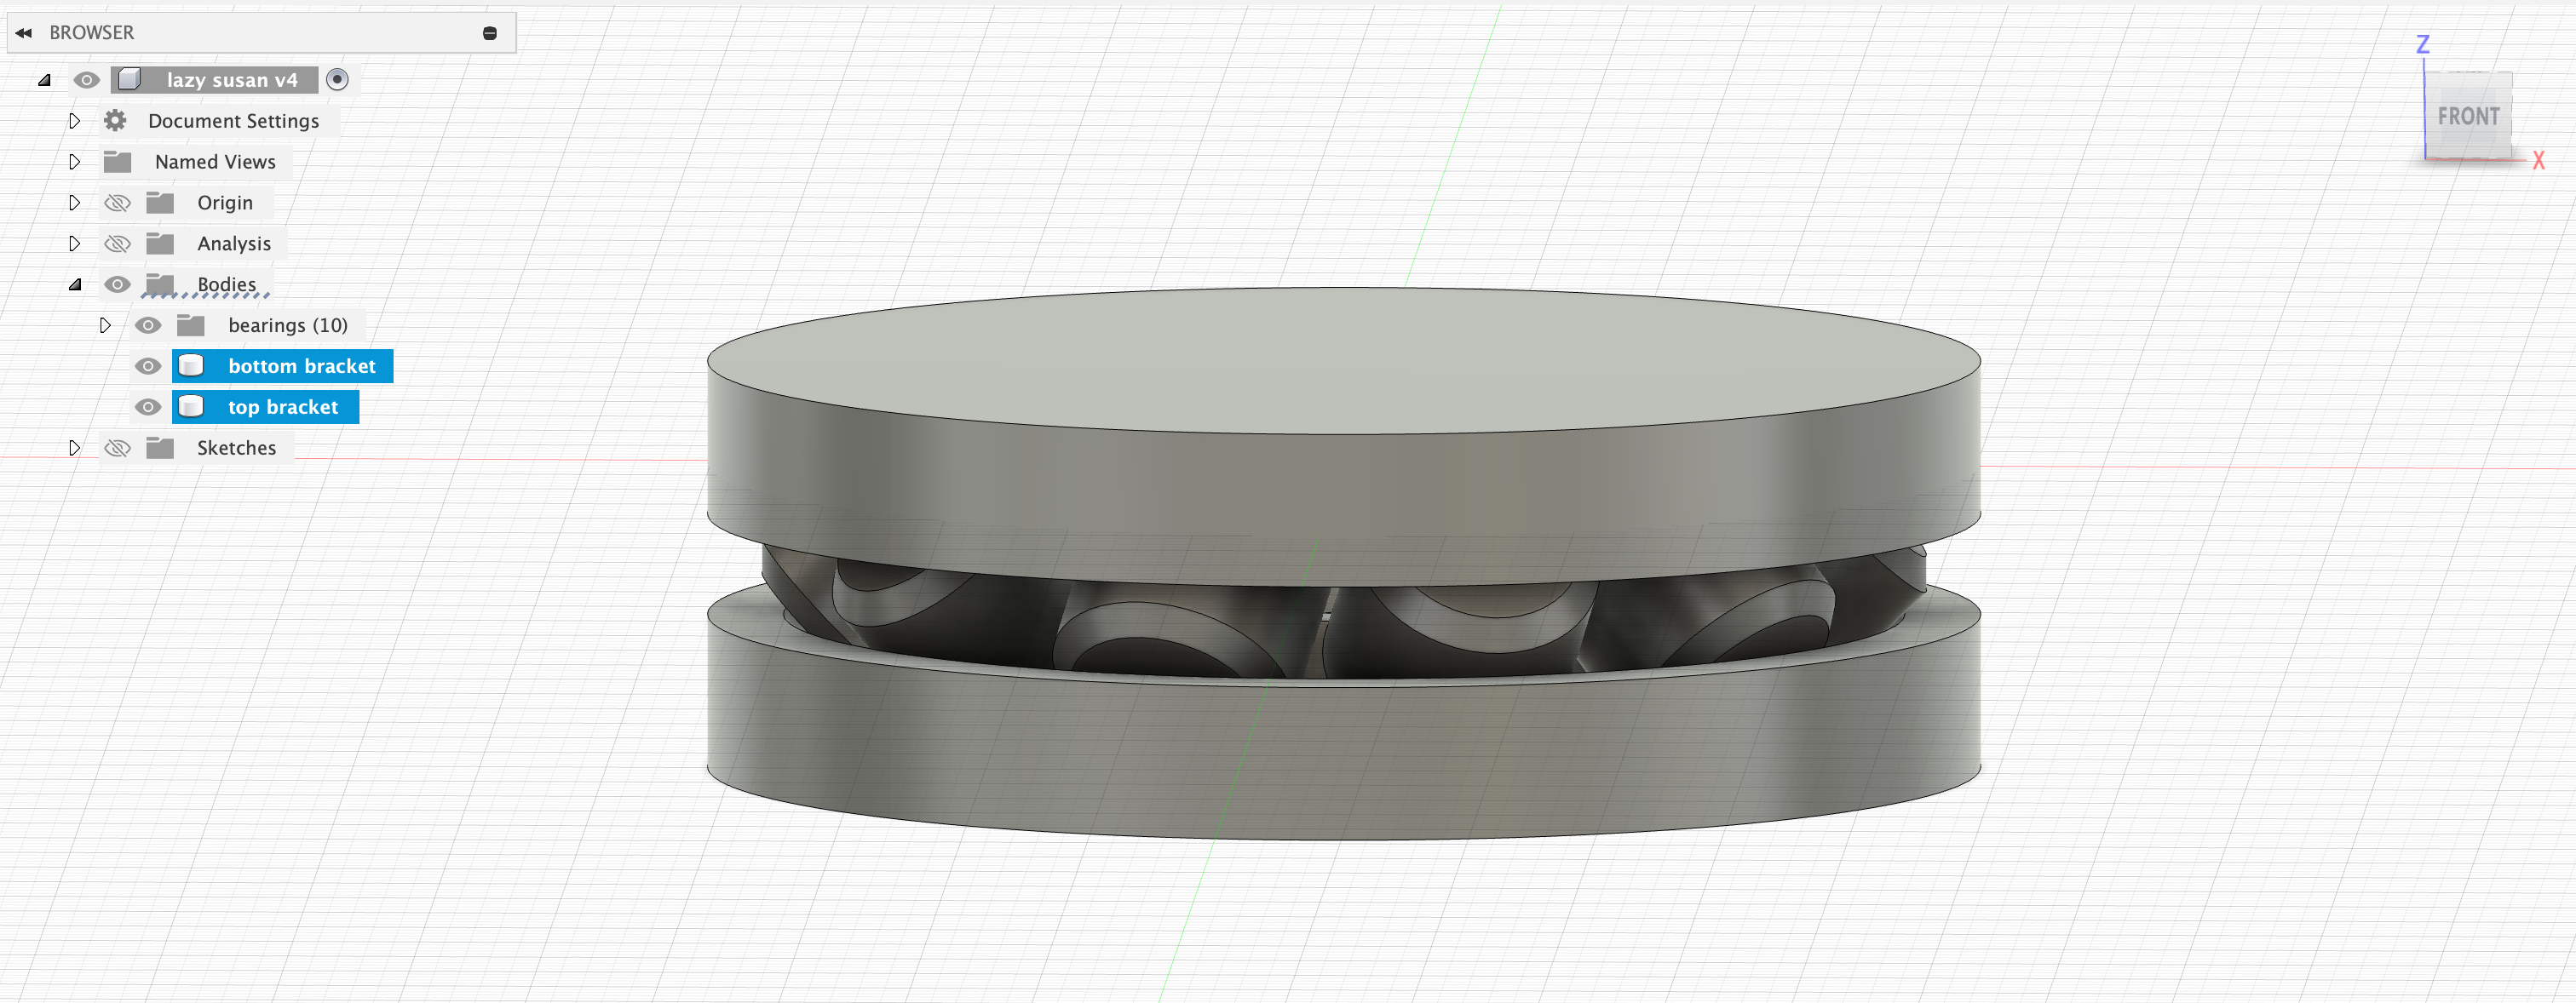
My original plan was to print out some sort of ball bearings that I could slot into a channel between a top piece and bottom piece like a very typical rotating thing. However, when I thought more about it, I realized that this probably is a bad idea because I know that 3D printers aren't very good at printing a sphere so it probably wouldn't end well. I then started thinking about other forms of bearings that I could use to facilitate the rotation. I first found this YouTube video where the guy uses cylindrical bearings inside of a guide template that helps to direct the cylinders around the track. This worked well for him, but I was skeptical of it for myself because I feel like it has some tight tolerances and potential for a less practiced person to screw it up when designing it. It also just felt wrong to me to have cylinders on a flat surface roll in a circle. I kept looking with special consideration for the fact that this was going to be 3D printed and not manufactured another way, and I came across this YouTube video where Robert very eloquently details a way of devising bearings specifically with 3D printing in mind. I don't want to steal his thunder as you should watch the video, but basically he uses two orthogonal cylinders on a V-shaped track to mimic the behavior and forces of a spherical ball bearing, but in a way that is more optimized for 3D printing. I found it to be really interesting the way that he talks about how many people just take the conventional way of making bearings and forcing a 3D printer to replicate that (poorly) instead of using the benefits of 3D printing to their advantage. He really emphasizes "playing to the strengths of the 3D printer rather than putting up with the limitations," which really caused me to shift how I thought about this whole project. He also provides a tutorial on how to build the bearing that he designs in TinkerCAD, which wasn't super useful to me since I wanted to do it in Fusion. However, the recommended video under that one was this YouTube video, which gave me the basic steps on how to create and troubleshoot this type of bearing. I wanted to build a full model of the lazy susan in Fusion instead of just making each of the components individually both because I think it will make for a better final product if I can see how they all fit together, but also because I wanted some more practice with this kind of stuff. I began by making the bearings themselves by rotating a rectangle instead of projecting a circle because I wanted them to be at an angle for this full model building, and the rectangle thing made more sense to me. Then making these into a circular pattern was super satisfying.
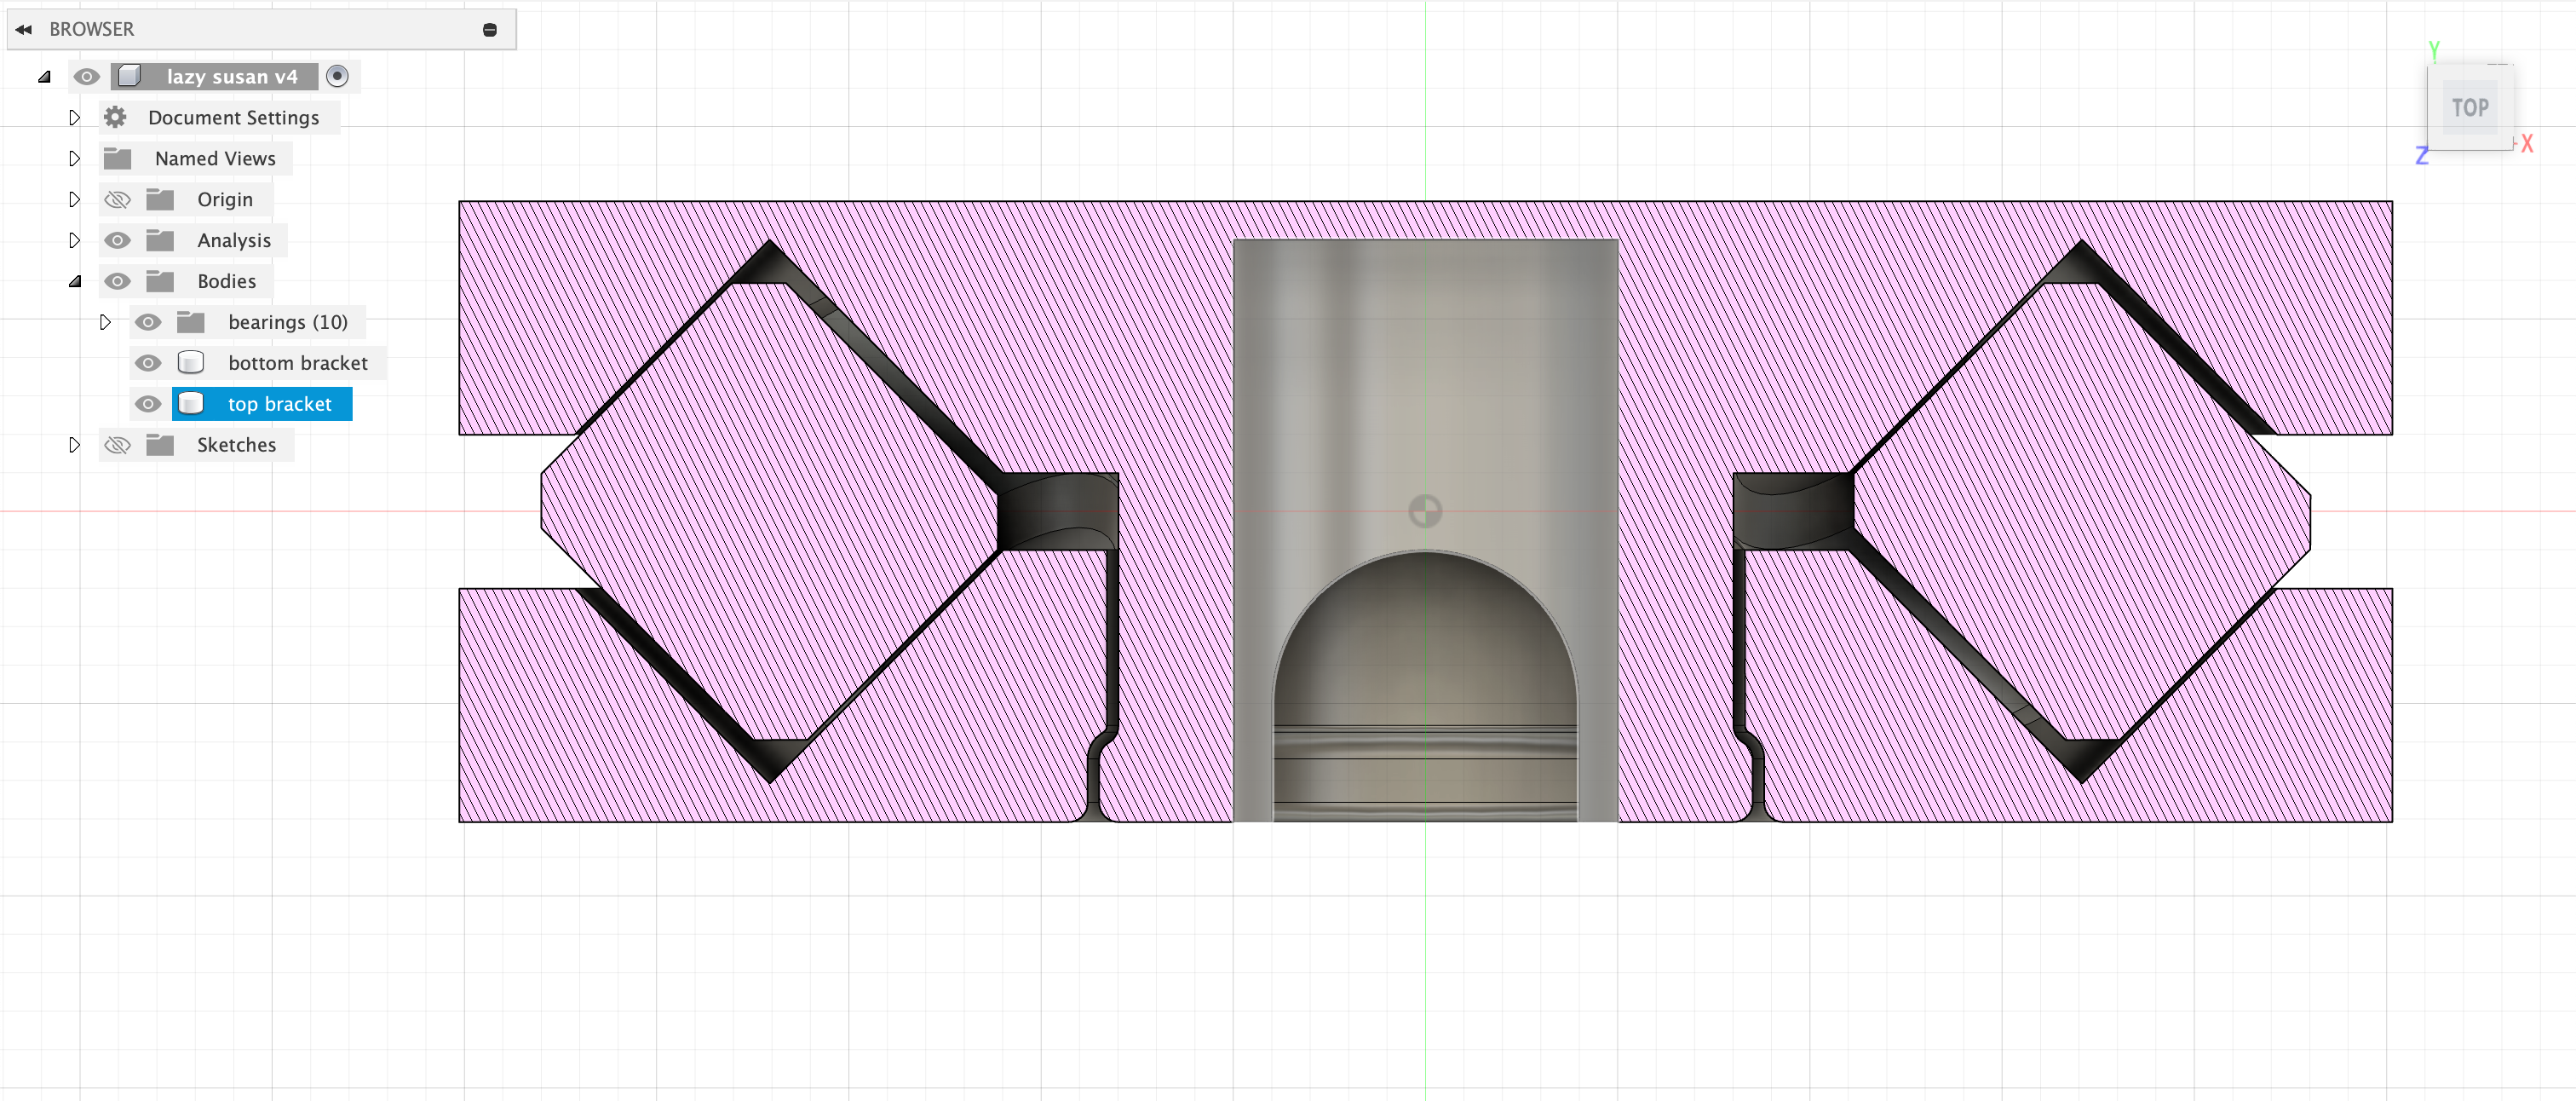
I then made a sketch that had a 45° channel in it for the rollers to sit in and rotated it around and mirrored it to form the top and bottom lids with the channels in it. Side note, the Inspect > Section Analysis tool was a life changer during this project. It helped so much as I was trying to visualize and play with dimensions for the bearings to roll around in the channel with minimal friction. I didn't like the video that I linked above because the product that it produced didn't turn at all due to improper measurements and incorrect conceptualizations of how the bearings turn in the channel. I tried to correct this in my sketch by making it so the sides of the cylinders touch the sides of the channels, but the tops of the cylinders don't (or at least have plenty of clearance on one side), as that causes too much friction.
However, I did follow that video for learning how to get the top and bottom casings to snap together because I unfortunately do not have the built-in snap function that TinkerCAD apparently has. I thought the way of doing it was so cool and made total sense - build a structure with a small lip, cut that shape directly out of the receiving side using the combine tool, and then building in a little space for both rotating and ease of removing the piece using the offset face tool.
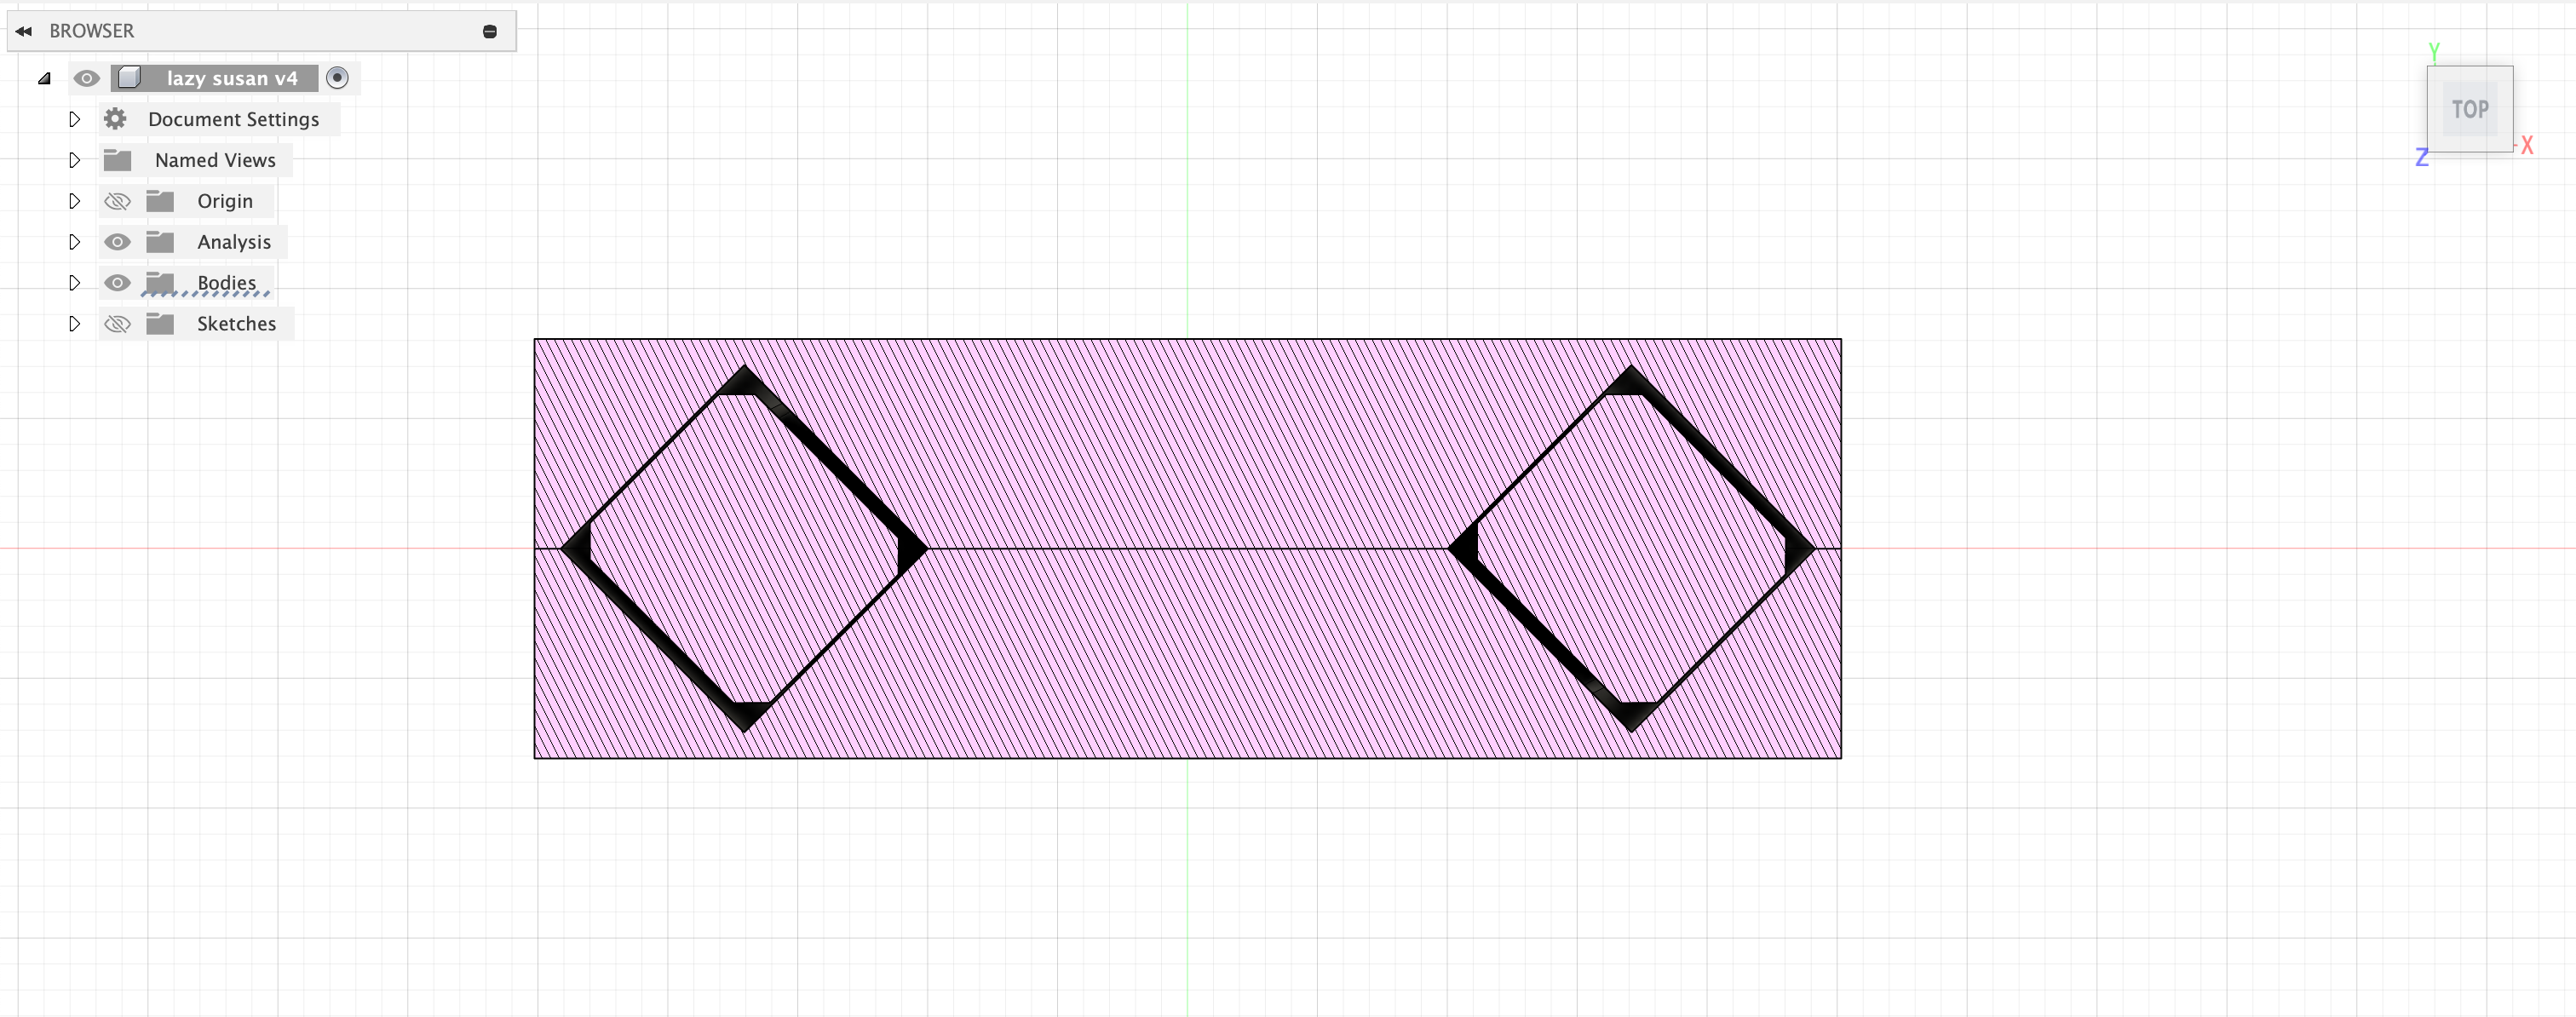
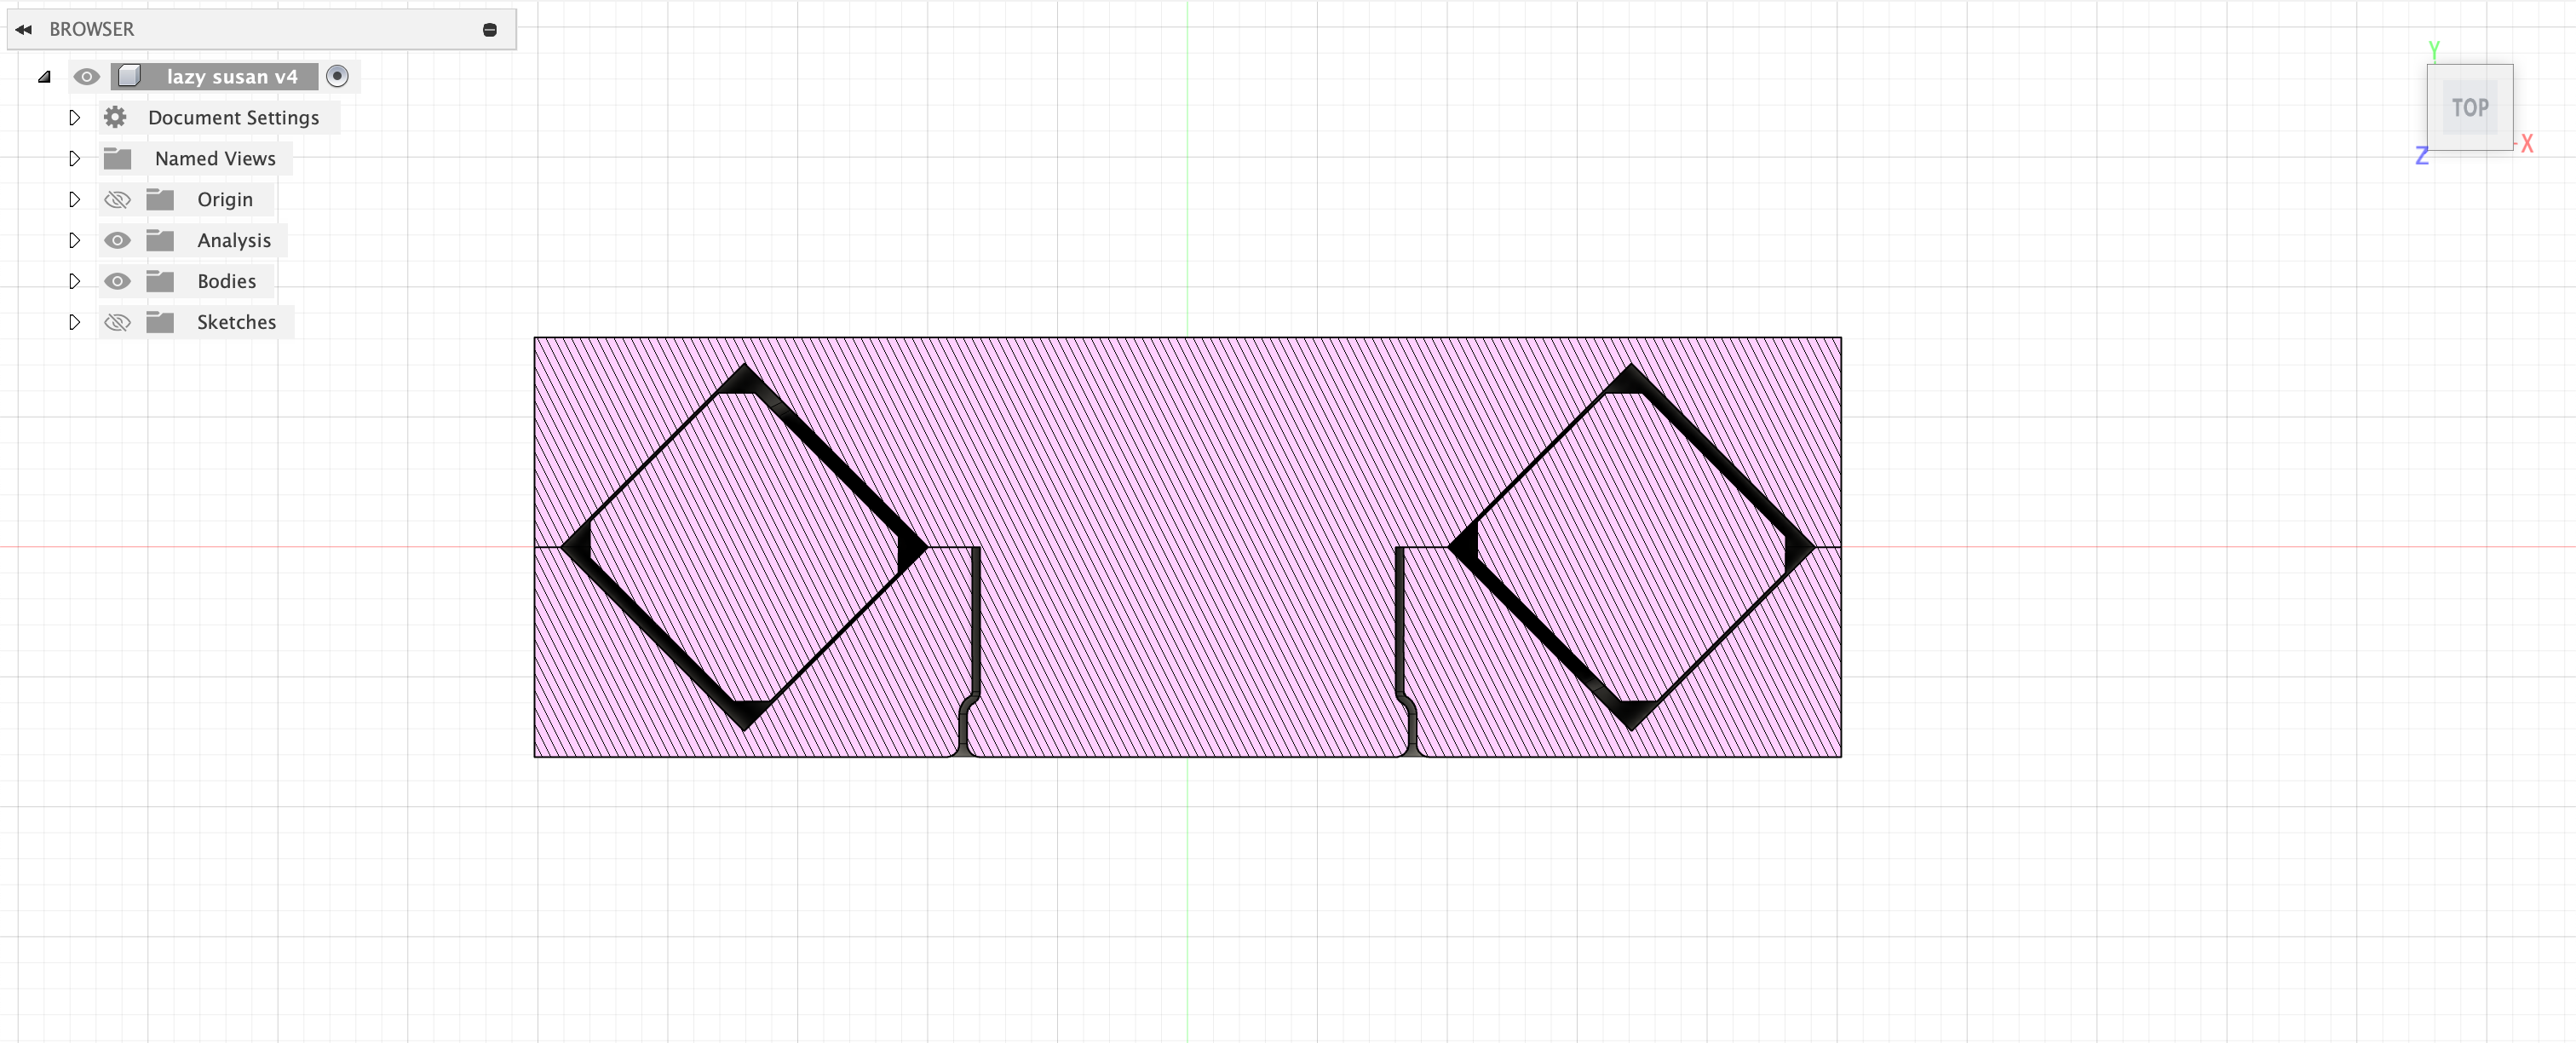
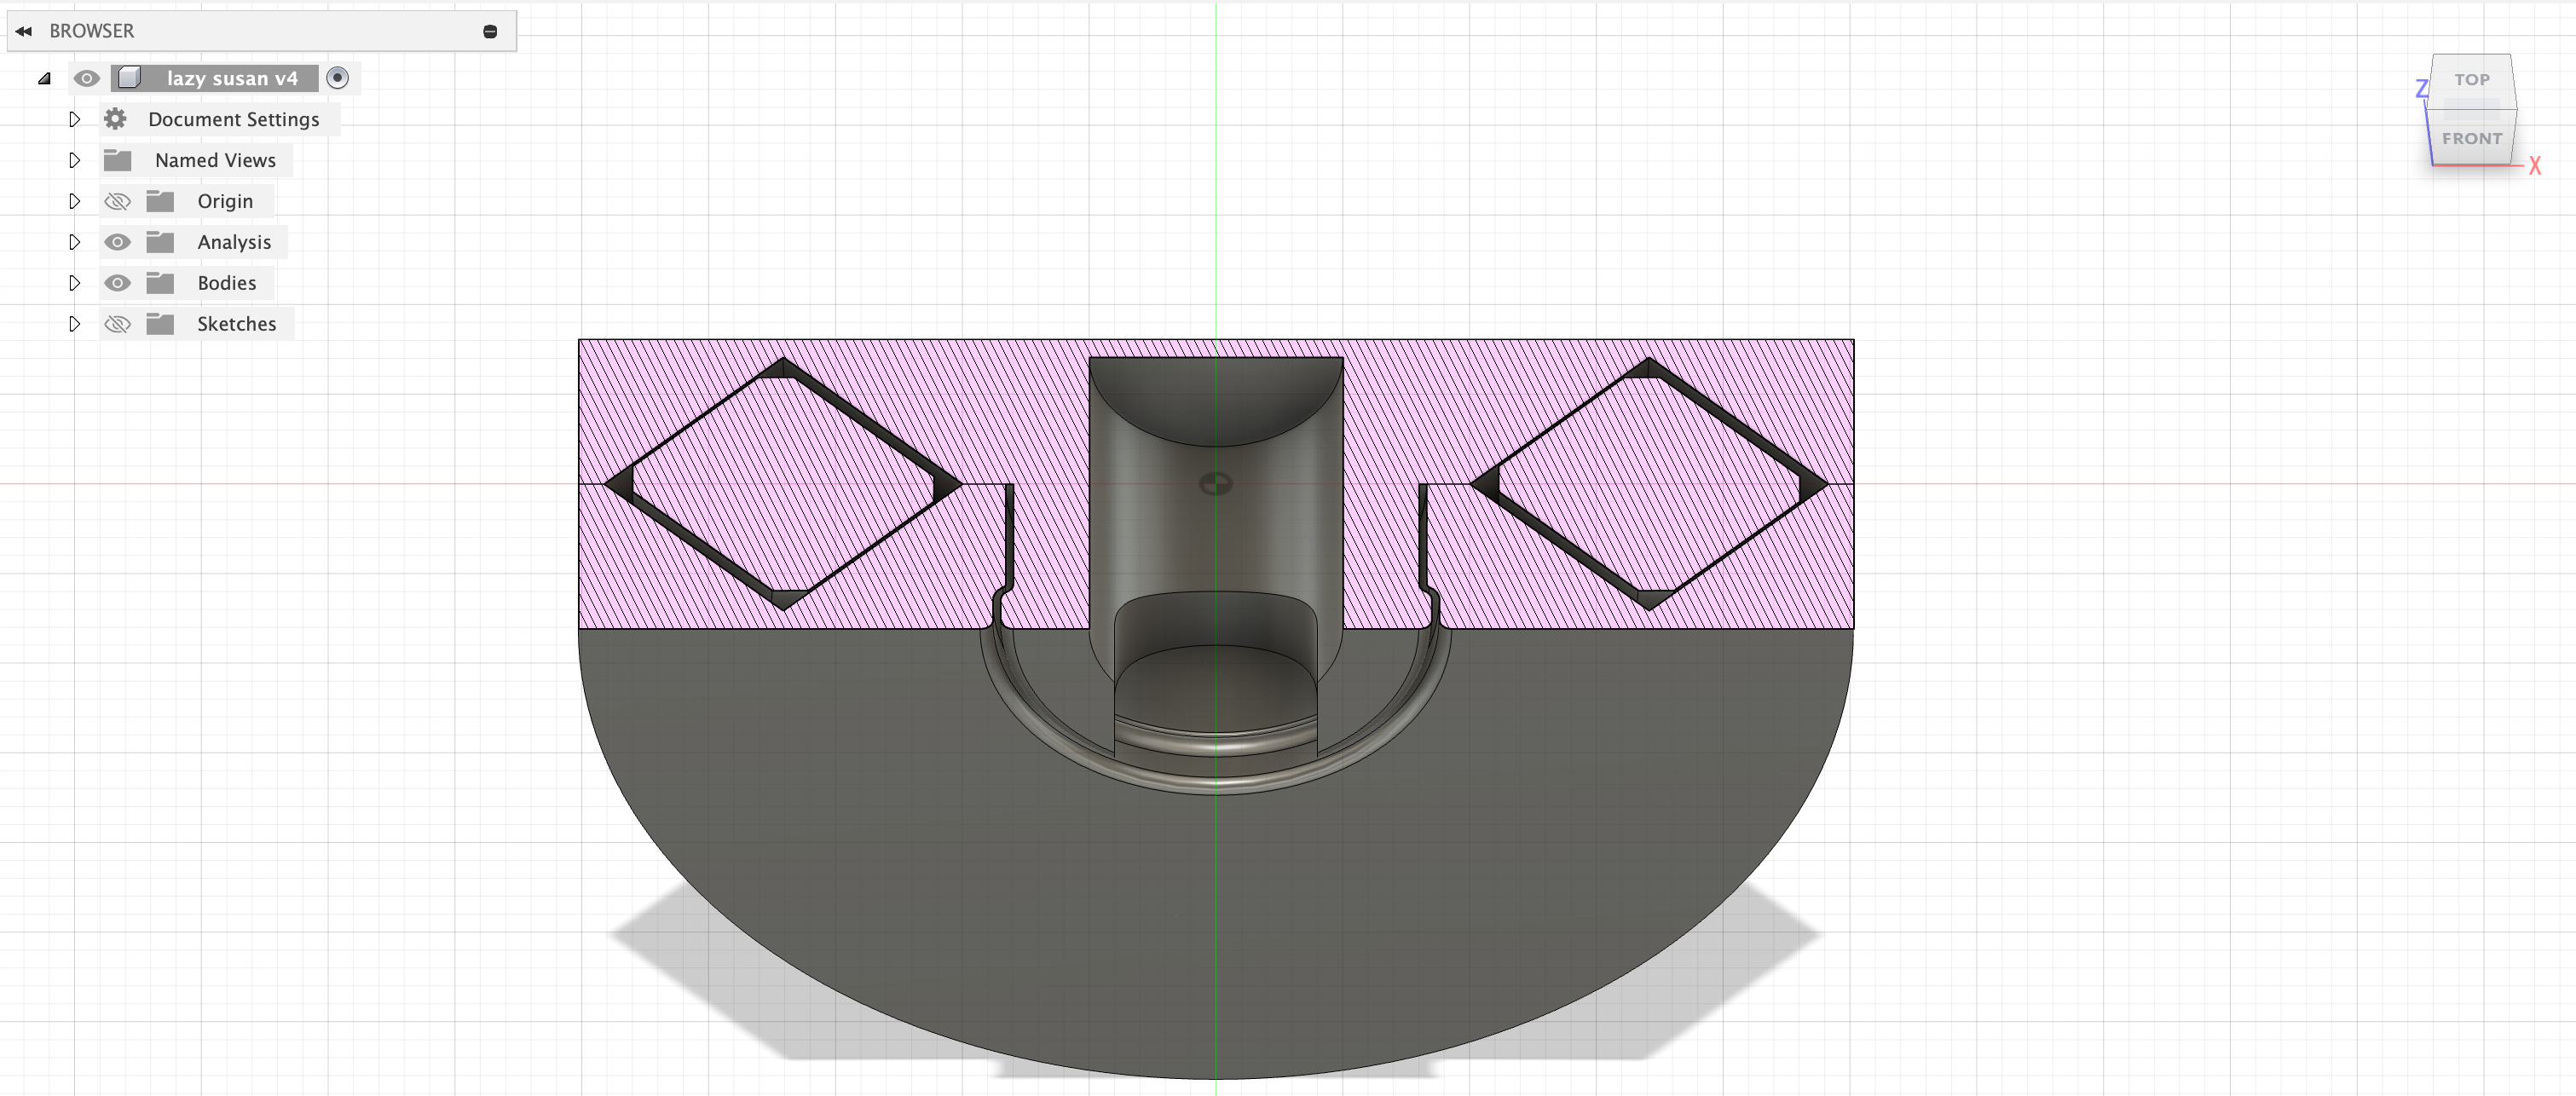
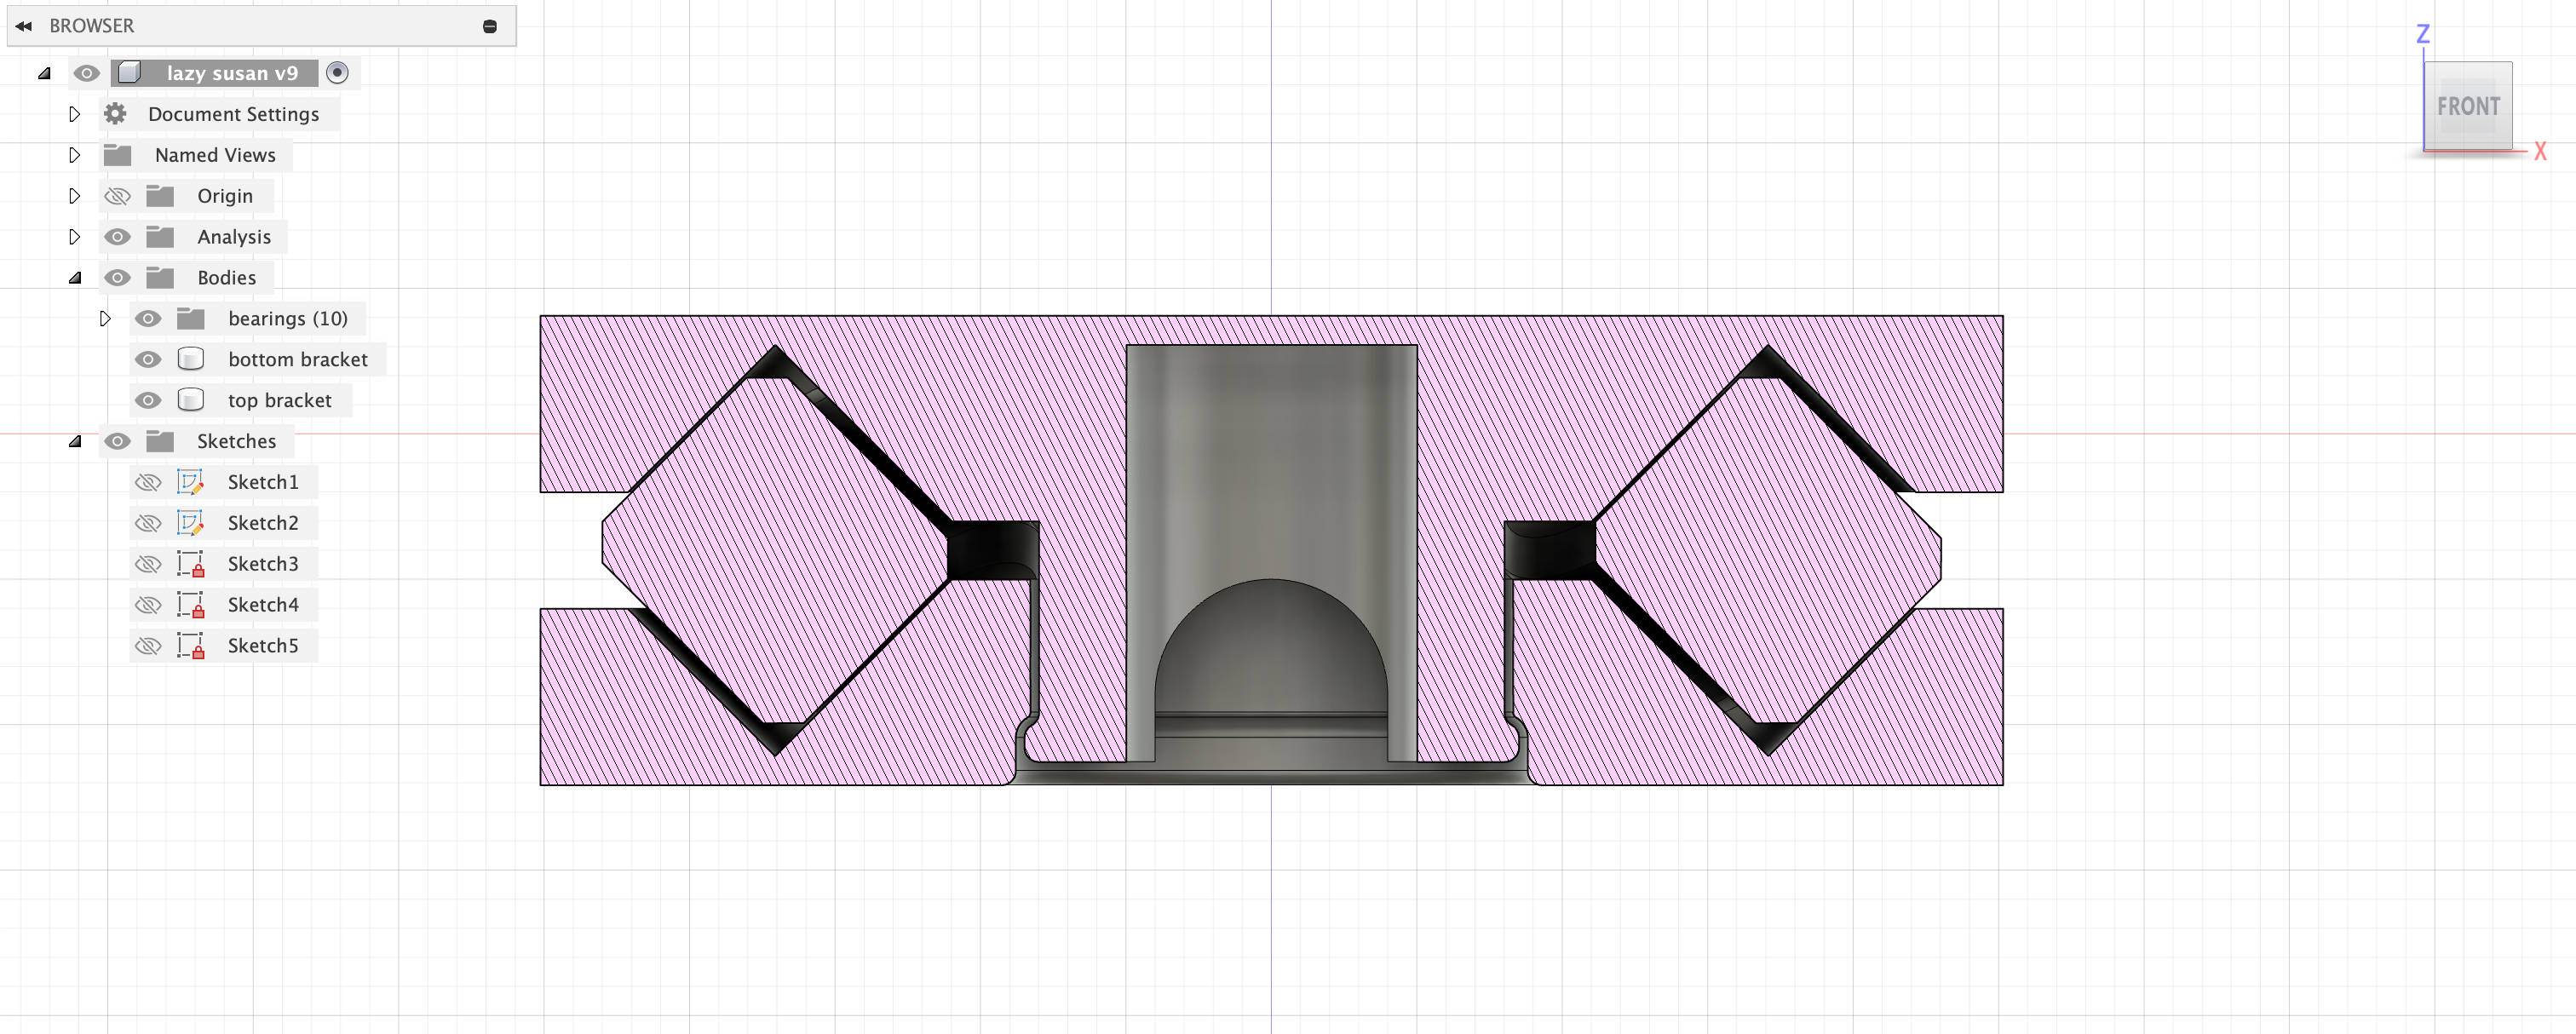
I also wanted the top to be solid so I could set my rocks on it without having to work around an axel hole or something, but I also wanted the snap to have some flex to it, and I felt like it was a lot of solid plastic as it stood. Because of that, I hollowed out a channel in the middle of the snap and scatched an arch-like shape that I used as a templat to cut a channel through the top of the snap to allow for it to flex. This is tough to convey in words, but you can see both of these channels in the cross section below.
At this point, I was basically done, but as it stood, the actual things that would be touching if I tried to rotate the top and bottom would be the casing itself grinding instead of the bearings rolling. Because of this, I used the press pull tool to push the edges of the casings back a bit to ensure that the contact is actually happening between the bearings and the channel and not between the casing. I also pushed it back a bit further on the outside of the casings so I could see some of the bearing action once it was printed. Below is the final cross section with all of this done.
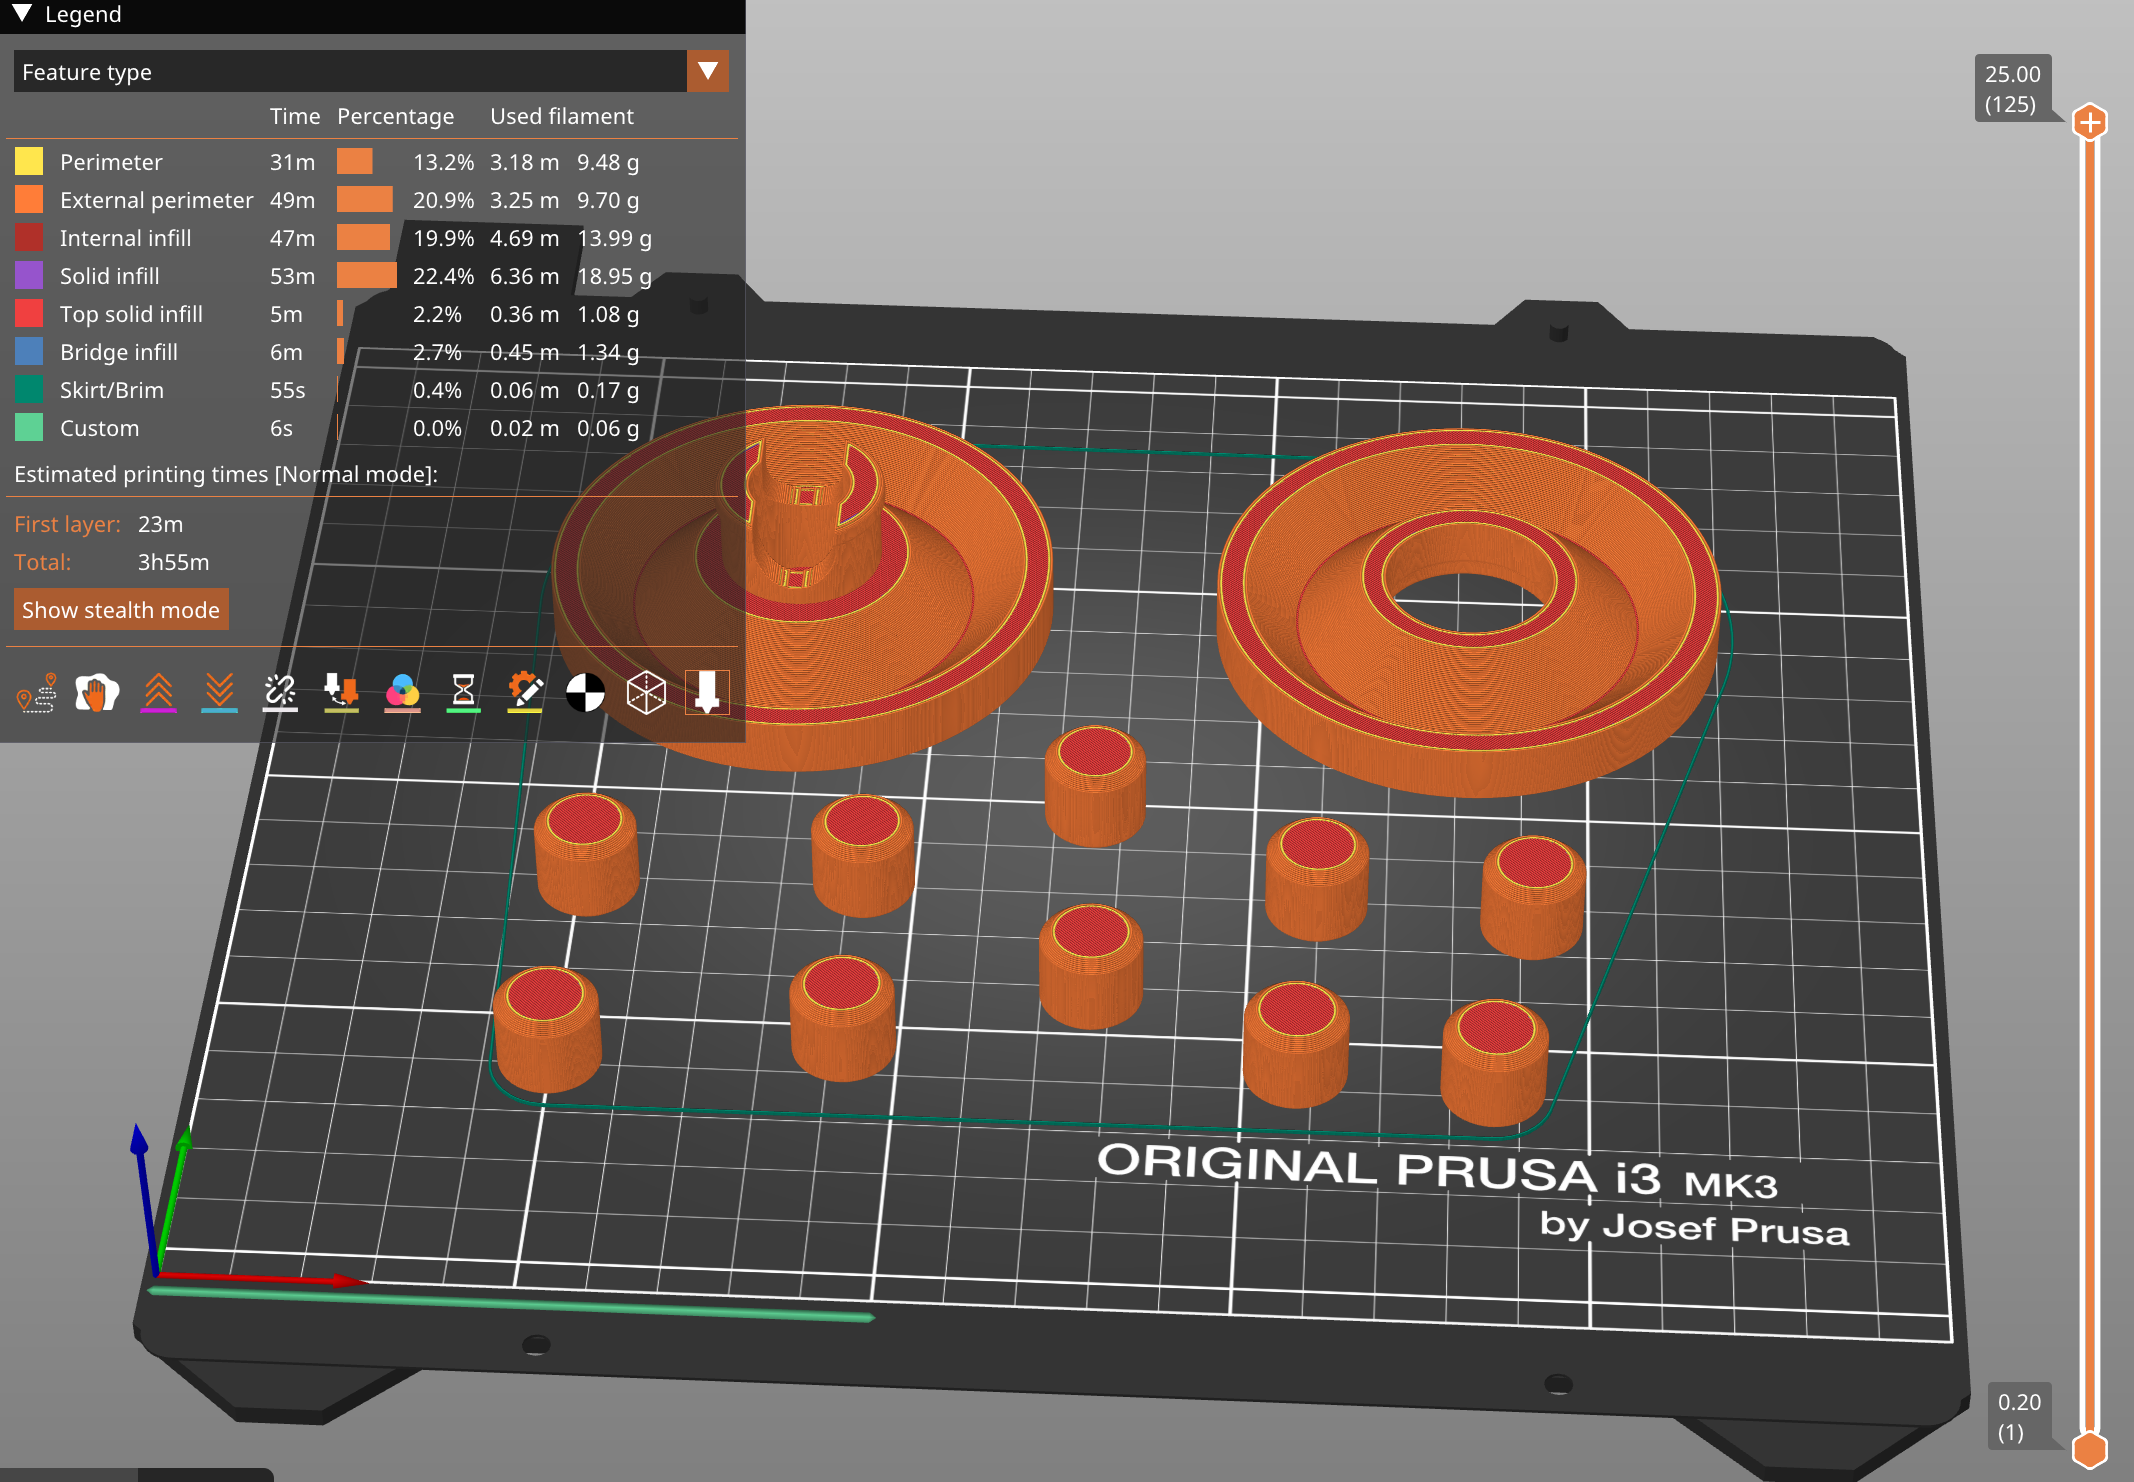
After that, I brought this all into PrusaSlicer. I only brought one bearing in and then created a bunch of instances of it since all the ones in my file were rotated. Thank goodness I also didn't need to have any supports because of the way that I designed everything here - I hate supports. I did throw a brim on though because Prusa was giving me a warning that the bearings might struggle if I didn't. I scaled it up a bit and played around with random settings like the infill, but settled on pretty standard things. It will be printed in PLA with a 0.20mm layer height. I also originally designed this with slightly arbitrary dimensions because I have many differently sized rocks, but I wanted the one that I printed to be for the fluorite that I scanned above because it is spectacular on all sides, and it would benefit significantly from being on a turntable. Because of this, I scaled the file up in Prusa and put it on the speed setting to keep it under 4 hours. Once I scaled it up, Prusa no longer said that I needed a skirt (the bearings must have been big enough to adhere enough themselves), so I got rid of it. Here is a screenshot of the final slice and the final 3D model.
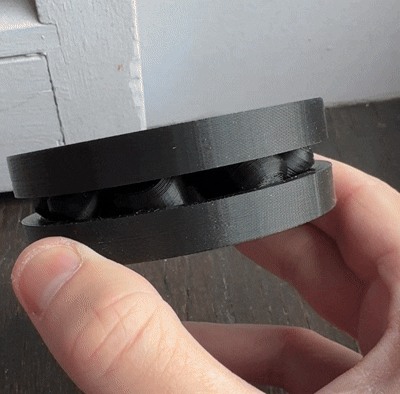
After printing this out, it works almost perfectly - the proof of concept is 100% there. The bearings spin in the channels perfectly and definitely do their job. They're not spherical, but the orthogonal cylinders ensure that rolling sides are touching all sides of the channel, making it spin perfectly. Additionally, all of the changes that I made to the project from the tutorial definitely improved its performance - the bearings are truly perfect. The only problem is that because there is a gap between the bearings and the channel, but there is not a gap between the snap and the ground, when the lazy susan is sitting on a flat surface, the majority of the force is resting on the top of the snap resting on the ground and not on the bearings or the bottom bracket. In fact, the bottom bracket can spin almost freely when resting on the ground. To fix this, I just offset the face of the snap to recess it further into the bottom bracket so the pressure is resting on the bearings and not the snap and printed it again. I also minorly changed some other dimensions to better fit my rocks, which is why I couldn't just reprint the top. The slice looks exactly the same as above since you can't tell the dimensions well when they're all laying on the printing bed.
The bearings spinning so well in the channel
After much trial and tribulation, it works! I am so happy with the way that this turned out. It totally lived up to my hopes and expectations, and I think this is a super cool way of working with the 3D printer instead of against it. Plus my coolest rocks are gonna be so dripped out soon with their own little rotating pedestal.
 See my final project page for all of the updates about that!